Wednesday, April 3, 2019

For my last post, I wanted to explore why a rectangle or square can have the same area but a different perimeter. This is a trickier concept and I wanted to find some materials to help students understand the topic. I think for a lot of students, seeing will be believing so incorporating manipulatives or having them sketch it out into the lesson will be somewhat essential.

This video from Khan Academy was pretty interesting on the topic of area and perimeter in general.


While I was relearning this topic I found it really cool that a square is also called a special rectangle. I had never heard this before, we just had to remember that a square is also a rectangle. I thought that having the 'special' affixed to the square was a great way for students to remember that even though it has 4 equal sides, it's not just a square, it's a rectangle too. The 'special' is that keyword that triggers their memory that the square fits in two categories

Now, back to perimeter vs area. On this site I found a fabulous explanation of why a rectangle that has the same perimeter doesn't have the same area:


Area vs. Perimeter of Rectangles

Date: 03/19/2000 at 16:19:30
From: Melissa
Subject: Perimeter and area

I don't understand how two rectangles with exactly the same perimeter 
can enclose different areas. Can you explain that to me?

Thank you,
Melissa

Date: 03/19/2000 at 23:15:36
From: Doctor Peterson
Subject: Re: Perimeter and area

Hi, Melissa.

I can start by convincing you that it's really true. A mathematician 
often looks at a question like this by thinking about the extreme 
cases, to get a feel for how far things can go. So let's think about 
extreme rectangles.

Suppose you make a loop of string, say 24 inches long, and try to make 
a rectangle of it, by putting four fingers into the loop and moving 
them around. What's the widest rectangle you can make? Pull your 
fingers as far as they can go, and you'll have something like this:
      ________________
    (O________________O)

If you imagine your fingers having no width, you can see that the 
widest rectangle possible would have zero height (or as little as you 
are willing to have and still call it a rectangle) and width 12 
inches. Its area will be zero.

At the other extreme, of course, you can stretch your rectangle 
vertically so that it is 12 inches high with no width, and again has 
zero area. Yet you know that in between you do have a positive area, 
and in fact it will turn out that a square (with the width and height 
the same) will have the greatest area you can make.

So how can area change when the perimeter stays the same?

Here's one way to look at it, suggested by a problem someone sent in 
recently. Let's reverse the question and try to build a rectangle out 
of 12 one-inch squares (a fixed area) and see why we won't always get 
the same perimeter. The 12 squares will have a total perimeter of 48 
inches (4 inches each). If I line up the squares in a row, only two or 
three sides of each square will be part of the perimeter, while the 
others will be shared with neighbors:
     _ _ _ _ _ _ _ _ _ _ _ _
    |_|_|_|_|_|_|_|_|_|_|_|_|

Each of the 11 "interior edges" between two squares takes away two 
inches from the perimeter (one side of each square), so the perimeter 
of this rectangle will be 48 - 22 = 26. Since the height is 1 and the 
width is 12, that's right: 1 + 12 + 1 + 12 = 26.

Now let's stack the squares closer together, in two rows of 6:
     _ _ _ _ _ _
    |_|_|_|_|_|_|
    |_|_|_|_|_|_|

Now there are 16 interior edges, because more of the squares are 
touching, so we subtract not 22 but 32 inches from the perimeter, 
which is now 48 - 32 = 16. Yes, this is 2 + 6 + 2 + 6.

Now let's lump them even closer together (more squarish), as a 3 x 4 
rectangle:
     _ _ _ _
    |_|_|_|_|
    |_|_|_|_|
    |_|_|_|_|

Now there are 17 interior edges, so the perimeter is 48 - 34 = 14 
inches, which is equal to 3 + 4 + 3 + 4.

Do you see what's happening? The more squarish the rectangle is, the 
more edges the squares share, and the less they contribute to the 
perimeter, so the less the perimeter will be.

The same sort of thing happens with three-dimensional shapes, and this 
effect is important in such questions as how your body dissipates 
heat: if we picture our squares as cells, then a flat shape will let 
each cell be close to the surface and cool itself off, while a 
roundish shape will force more cells into the interior, where they 
won't be part of the surface, and also won't lose heat easily. Lumpy 
things have less "outside" for the same amount of "inside." (That's 
why elephants have thin ears, to radiate more heat, and why cactuses 
have thick stems, to retain more moisture.)

So the basic answer to your question is that area measures the 
"inside" of a shape and perimeter measures the "outside," and by 
changing the shape we can move outside parts to the inside without 
changing the outside. Or, if we keep the perimeter the same as you 
originally asked, we can keep the same "outside" but pack more 
"inside" into it, which will puff it up.

Thanks for the question - it's fun to think about this sort of thing!

- Doctor Peterson, The Math Forum
  http://mathforum.org/dr.math/   


Here are a couple sites I liked to create worksheets...I will be looking for others because it's good practice to do more research and because there may be better resources out there! 
What I liked about these sites was that the worksheets appear to be customizable so you can adjust them for different level groups pretty easily

https://www.commoncoresheets.com/Area.php
Math Joke of the Week:
Q: What do you get when you cross geometry with McDonalds? 
A: A plane cheeseburger. 

Tuesday, April 2, 2019

This week I had the chance to help my youngest son with multiplying fractions. He was having a really frustrating time with it and was almost in tears. The first time I showed him what to do he got very upset because it was not how he had been shown in class. "it just doesn't make any sense!" he yelled. At that point, we took a break. We walked down to the store bought some milk and talked about non-math topics. By the time we got back home, he was feeling much calmer and ready to try again.
It turns out that one major source of his frustration was the mix of whole numbers and fractions. Here's an example of one of his equations:

2 1/3 x 4 1/8

What helped him understand what was going on was to visualize that the 2 and 4 were both fractions and add them together

3/3+3/3 = 6/3

6/3+ 1/3= 7/3

8/8+8/8+8/8+8/8=32/8

32/8+1/8=33/8

Then we took and multiplied those numbers

7/3 x 33/8 =231/24

After multiplying we had a lot of simplifying to do! We figured out how many times 24 would go into 231. Markian thought it would be a good idea to start by adding 24+24=48. Then we added 48+48=96. My son got excited and said- look! we're almost there! So we continued to add 24's till we went over 231. We were able to add 24 into 231 9 times before going over and had 15 left over.
9 15/24....well it looked like we had another fraction to simplify! this one was easier, both numbers are divisible by 3 and can be simplified to 5/8, so our answer was 9 5/8.  Phew!

This poster was really helpful, so was taking the time to take a step back and look at what a whole meant and how it applied when multiplying fractions.


Math Joke of the week:

Q: What does the zero say to the eight?
A: Nice belt. 

Sunday, March 17, 2019


Converting fractions into...Decimals!


For this week’s post, I wanted to explore fractions again, but this time converting them not into percentages, but into decimals.

To convert a fraction into a decimal, you take the numerator of the fraction and divide it by the denominator.

It might help to review or have a visual aid (like Trenice referenced in one of her blog posts) that reminds students that the denominator is the bottom number of the fraction and the numerator is the number on top.


When converting a fraction to a decimal the fraction bar is the same as a division sign:
a/b   =   a ÷ b 
On https://www.math-salamanders.com I found these terrific fraction information cards that I will definitely be using in my classroom and to brush up on y understanding of the topic. What I really liked about these cards is that they have multiple representations of the same value. This can help students connect the relationship between, for example, 3/10 equalling 0.33 and 30%


Fraction
Equivalent to
Decimal
Percent
1/2
2/2

1/3
2/3
3/3

1/4
2/4
3/4
4/4

1/5
2/5
3/5
4/5
5/5

1/6
2/6
3/6
4/6
5/6
6/6

1/8
2/8
3/8
4/8
5/8
6/8
7/8
8/8

1/10
2/10
3/10
4/10
5/10
6/10
7/10
8/10
9/10
10/10
1/2
1

1/3
2/3
1

1/4
1/2
3/4
1

1/5
2/5
3/5
4/5
5/5

1/6
1/3
1/2
2/3
5/6
1

1/8
1/4
3/8
1/2
5/8
3/4
7/8
1

1/10
1/5
3/10
2/5
1/2
3/5
7/10
4/5
9/10
1
0.5
1.0

0.333
0.666
1.0

0.25
0.5
0.75
1.0

0.2
0.4
0.6
0.8
1.0

0.166
0.333
0.5
0.666
0.833
1.0

0.125
0.25
0.375
0.5
0.625
0.75
0.875
1.0

0.1
0.2
0.3
0.4
0.5
0.6
0.7
0.8
0.9
1.0
50%
100%

33.3%
66.6%
100%

25%
50%
75%
100%

20%
40%
60%
80%
100%

16.6%
33.3%
50%
66.6%
83.3%
100%

12.5%
25%
37.5%
50%
62.5%
75%
87.5%
100%

10%
20%
30%
40%
50%
60%
70%
80%
90%
100%

Math Joke of the week:

What did one decimal say to the other?
Answer: Did you get my point?


Wednesday, March 6, 2019

Perspective time.....I've been writing and thinking a lot about shapes, volume, the Golden Mean...these are elements of art and how math shapes the world around us. With them, we can create on a flat 2-dimensional piece of paper something that comes to life and has depth.


Aside from shadowing and light what helps our eyes and brain see 3d forms on flat paper is perspective. I haven't been able to try this yet, but, as I was thinking about perspective and prospective students I wondered if this might be another way to help students who don't think they can be good at math. A student can observe that an object that is farther away looks smaller. They can observe the shape of the object in relation to itself and the objects around it. There is familiarity in these observations because we observe them without realizing it every day. It's really an easy way to have the students connect that their visual art brain has been working the math brain all along.


Perspective can be found by using the X Y Z axis. While it is important for the student to be able to plot a point on a graph, it's also equally important to show them how math is working all around them.


A cute saying I ran across on www.gradeamathhelp.com that might help the students remember which axis is which was x to the left and y to the sky. It might lack a little directionality, but it can help them get started.
The x y axis is also known as the coordinate plane or cartesian coordinate system. Every point in space, on earth or in your room, has two coordinates which place it uniquely in that spot. When we look at google maps to find the location of the new trampoline park we sometimes see a string of weird numbers with an N or W appended to them. These are the coordinates of the trampoline park's location on earth's x y axis that defines it as being in your town rather than on an island in the South Pacific. Pretty cool, huh? Starting simple is always good. 

A popular technique to learn how to use the x y axis is to draw and number it and then count up the y axis, mark it and then count over on the x axis and bring your finger up till it meets the line that marks the y coordinate. 


Math Joke of the Week:
Q.What do you say when you see an empty parrot cage? 
A. Polygon.
Last post I talked about shapes. In this post, I want to explore volume. This was a topic that was difficult for me as a student so I really wanted to review it and spent quite a bit of time reading and practicing. I found a few really great resources to help explain how to find the volume of an object.
From what I read, starting with a cube makes it easier for the students to associate the shape to the equation. I think it would be helpful to also have manipulatives for them to build and measure. One page had an example of using sugar cubes...though I'm sure students would love that...I think that having a class that energized would be a unique experience I'm not sure I want to have!

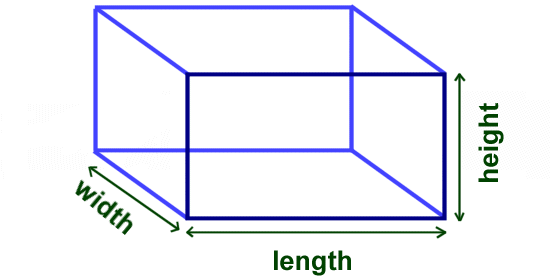
How to find the volume of a cube or a rectangular box of tissues

Volume of a Box 


Volume= l x w x h

When trying to find the volume of a box we have to multiply length x width x height
So if our box of tissues was 10 inches long, 4 inches wide and 3 inches wide we would have the equation 10x4x3=120. For the area of a box, it doesn't matter what number is multiplied first, the sum will be the same.

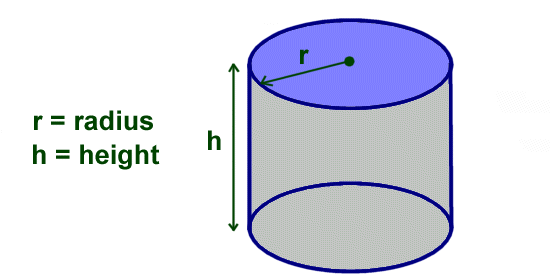
Volume of a Cylinder 


Volume = πr2h

The formula to find the volume of a cylinder is similar to that of a cube because you are using multiplication. The big difference is that you are using the radius squared as well as π, two numbers that students might be less familiar or apprehensive using. 

The equation we would use is 3.14 x radius x radius x height so if our cylinder has a radius of 4 inches and a height of 6 inches we would have the equation 3.14 x 4 x 4 x 6= 301.44.


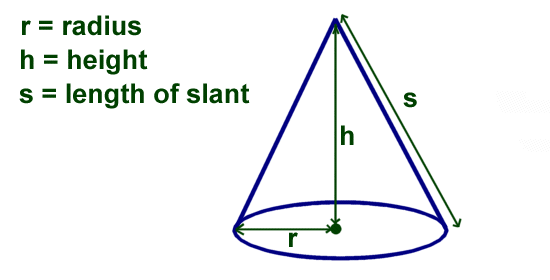
Volume of a Cone


Volume = 1/3πr2h

Now, we have to change things up a bit when we get to the volume of a cone and do some division! We also can use the Pythagorean Therum to find the slant, pretty cool stuff! The equation we would use is very similar to the one we used to find the volume of a cylinder with the important addition of division, 3.14 x radius x radius x height÷3

Math Joke of the Week: 

Q: How do you make one vanish? 
A: Add a 'g' to the beginning and it's gone!

Tuesday, March 5, 2019


I thought it would be interesting to follow the idea of math and how it applies to the world around the students. One assignment that my sons loved was finding shapes hidden around the house. This was like a really fun treasure hunt for them. For them, the assignment was done almost too quickly and their papers were filled with all the places they found circles, triangles, rectangles, and squares. The assignment reinforced the shapes they had already learned and it helped connect the idea that the world is made up of shapes. Further, this activity also began to show that shapes can make up 3-dimensional objects that they would learn about later. 

In looking for other activities to help students solidify their understanding of shapes I ran across this neat worksheet:
What I liked about this worksheet was that it engages the student to use their higher cognitive thinking skills rather than just identifying what shape is presented and could be used as a check in to see that the students have a concrete understanding of shapes.

Math Joke of the Week: 
What kind of tree does a math teacher climb? Geometry.

Sunday, February 17, 2019

I was talking to my Dad the other day about the Golden Ratio and it's a relationship to art and thought it would be a good topic to help students relate math to the real world.

The Golden Ratio is a ratio based on Phi 1.6180339887498948420. Phi is similar to Pi in that it also repeats to infinity. In the golden ratio, A +B is to A as A is to B. It can be found by dividing a line into 2 parts so the longer section is divided by the smaller section and the smaller section is equal to the whole divided by the longer sectionWhich sounds a little confusing. But visually, it all starts to make sense.

In the golden ratio, <em>a + b</em> is to <em>a</em> as <em>a</em> is to <em>b</em>.
Artists, Photographers, Designers all use the Golden Ratio in composing works of art and advertisements. In art, the Golden Ratio helps to create a balance between detail and negative space. It also gives the image flow, meaning that the artwork draws your eye in first to a particular area and then leads you to view the rest of the piece. You can also see the Golden Ratio in the design of architecture and nature.


Math Joke of the Week:
Q. What do you get when you cross a math teacher with a tree?
A. Arithma-sticks.

For my last post, I wanted to explore why a rectangle or square can have the same area but a different perimeter. This is a trickier concept...